How to Setup a PKT Mining Pool
Block Mining - Collecting Announcements from Announcement Miners and using them to mine blocks.
Block mining involves setting up a mining pool. PKT mining pools require expert networking experience, significant hardware and bandwidth infrastructure with a minimum of 25 gbps of bandwidth ingest. Block miners gain efficiency on the difficulty of the work, based on the amount of new announcements they have in memory at the time of mining. This incentivizes mining pools to pay announcement miners to supply announcements. Block mining is typically done at the mining pool's datacenter.
Mining
PacketCrypt is a bandwidth hard proof of work, this means it requires lots of bandwidth to mine. Miners collaborate with one another by sending small messages (called Announcements) and the sending of these messages requires a large amount of bandwidth.
Miners who are working in collaboration with one another are members of a mining pool, therefore all mining of PacketCrypt is done in pools.
PacketCrypt mining is split into two distinct stages:
- Announcement Mining - Using your CPU to create Announcements
- Block Mining - Collecting Announcements from Announcement Miners and using them to mine blocks
Block mining is typically done at the mining pool's datacenter, however Announcement mining can be done from anywhere.
How to Announcement mine
There are a number of options available when it comes to installing the PacketCrpyt announcement miner. Choose whichever best suits your technical ability:
1. Install a Pre-built Binary
Pre-built packetcrypt binaries (for linux) or installation packages (for macos) and archives (for windows) can be downloaded from packetcrypt releases page.
- For windows, download the zip archive suffixed with
-windows.zip
and extract its content. - For macos, download the package suffixed with
.pkg
and click on its icon in the Finder for installation. - For linux, download the binary suffixed with
-linux_amd64and rename itpacketcrypt. -
- If you're on Arch linux or Manjaro, you can install the packetcrypt AUR package
2. Deploy a Docker Image
There is a PacketCrypt Docker image available, which can be used for announcement mining.
To install:
-
Download and install Docker for your operating system.
-
Download the PacketCrypt Docker image:
$ docker pull thomasjp0x42/packetcrypt
There are also PacketCrypt Docker images built without the portable flag (--no-portable) which may increase the performance of the announcement mining while reducing CPU compatibility. One such image (compiled on AMD 5950x) is available at thomasjp0x42/packetcrypt-amd64. Additionally, for ARM devices such as Raspberry Pi, there is an image available at thomasjp0x42/packetcrypt-arm64. The arm64 image will also work on Apple silicon such as the M1 and M2 chips.
- Run the container similar to the commands described in the Begin Announcement Mining section, except replace this part of the command:
$ packetcrypt
with this command to run PacketCrypt from Docker:
$ docker run thomasjp0x42/packetcrypt
The final command will be formatted like this:
$ docker run thomasjp0x42/packetcrypt ann -p <your_wallet_address> <pool_1>
More information can be found at the PacketCrypt DockerHub page
3. Build From Source
Building from source will generally offer the best mining performance but requires more technical knowledge than the previous two options.
First install rust if you haven't, see: rustup
git clone https://github.com/cjdelisle/packetcrypt_rs
cd packetcrypt_rs
cargo build --release
See the PacketCrypt GitHub repository for more detailed instructions.
Begin Announcement Mining
Important
You cannot mine into the electrum wallet, You can only mine into the Command Line Wallet, the Pkt.World Wallet or the Mac GUI Wallet .
To begin mining, you will need the address of your wallet and you will need to choose a pool.
There are two ways to configure the announcement miner; by using CLI parameters or by using a configuration file:
Using the CLI
packetcrypt ann -p <your_wallet_address> pool_1 [pool_2 pool_3 pool_4]

[or for windows]

packetcrypt.exe ann -p <your_wallet_address> pool_1 [pool_2 pool_3 pool_4]
Using a Configuration File
A configuration file must be in JSON format. The file can be loaded from the local filesystem or from a web-accessible location.
Any CLI parameters used will overide the corresponding settings in the configuration file.
Example config.json:
{
  "payment_addr": "<your_wallet_address>",
  "pools": [
    "pool_1",
    "pool_2",
    "pool_3",
    "pool_4"
  ]
}
packetcrypt ann -c "./config.json"

[or]

packetcrypt ann -c "https://example.com/config.json"

[or for windows]

packetcrypt.exe ann -c "./config.json"

[or]

packetcrypt.exe ann -c "https://example.com/config.json"
Announcement mining can be done into a single pool or multiple pools. When you announcement mine into multiple pools, you will be paid by each pool that you submit announcements to.
pool_1 is the pool running the highest difficulty. If you notice problems, you can test listing the pools in a different order. The number of pools you mine into is at your discretion. If a pool is down or malfunctioning you will notice the pool is not mining at [100%] in your mining feed and you can choose to remove the under-performing or malfunctioning pool.
How to install a PKT miner on Mac
- Install the Zulu or CLI PKT Wallet from https://docs.pkt.cash
- Download the PacketCrypt.pkg for mac
- Open your Terminal
- Install Rust by entering in the command:
$ curl --proto '=https' --tlsv1.2 -sSf * https://sh.rustup.rs | sh - Press 1 to confirm
- Enter the command:
$ sudo install make - Enter the command:
$ git clone https://github.com/cjdelisle/packetcrypt_rs - Enter the command:
$ cd packetcrypt_rs - Enter the command:
$ ~/.cargo/bin/cargo build --release - Enter the command:
$ ./target/release/packetcrypt ann -p [your PKT Wallet Address] [pool 1] [pool 2] [pool 3] [pool 4]
Choosing Pools to mine in
You can mine in as many pools as you have the bandwidth to supply. The same data will be uploaded so your CPU is only used once. Currently the pools which are regularly winning blocks include:
- Pkteer:
http://pool.pkteer.com - PKTPool:
http://pool.pktpool.io - PktWorld:
http://pool.pkt.world - Zetahash (f.k.a. Srizbi):
https://stratum.zetahash.com
In general the recommendation is to list the pool with highest difficulty in the first position to ensure your announcements will be accepted, as the standardized policy is to accept announcements of a higher difficulty for pools with a lower base difficulty. In some cases the rewards might vary depending on the pool order regardless of difficulty, subject to custom policies implemented by the respective pools.
(Check the relevant channels on Discord for current pool statuses)
You should test your daily earnings on each pool to see which one is best. Your mining revenue depends on how much each pool allocates towards announcement miners as well as how much hardware they are using in-house. The pools are winning different blocks and if you mine to just one pool, your not getting any payment from the others when they win a block. It's the same with mining to a pool that is not winning any blocks.
Limiting System Resource Usage
Limiting the system resources available to Packetcrypt may negatively effect your mining power but can be useful to conserve resources for other processess.
Limit CPU Usage
Announcement mining is a resource intensive process. By default, Packetcrypt will use 100% of the available CPU resources. CPU usage can be limited by assigning a limited number of threads to packetcrypt using the -t CLI parameter or "threads" key if using a configuration file.
Example of assigning four (4) threads to Packetcrypt:
packetcrypt ann -p <your_wallet_address> pool_1 [pool_2 pool_3 pool_4] -t 4
or
{
  "threads" 4
}
Limit Bandwidth Usage
Bandwidth usage is directly related to two main factors:
1 - Mining difficulty of the primary pool (the first pool listed in Packetcrypt pool configuration)
- A lower difficulty means higher bandwidth usage
2 - The number of pools mined
- Packetcrypt will send the same Announcements to each pool mined
Bandwidth usage can therefore be limited by selecting a higher difficulty pool as the primary pool and/or by mining to fewer pools.
Block Mining & Running a Pool
Because each block miner must use as much bandwidth as all of the announcement miners combined, block mining is typically done at the location of the pool. Even a pool operator who wanted to support external block mining would find that the pool itself would need enough upload bandwidth to match all of the block miners - which would be completely untenable. If you are interested in block mining, contact the pool operator and discuss sending hardware to their location.
Starting your own pool requires setting up a number of services:
- pktd node (one or more) - One pktd instance is required for the Master to function, each of the Block Handlers may optionally use separate pktd nodes.
- Master (one) - This node coordinates all of the others and provides work files and configuration
- Ann Handler (one or more) - These are high performance nodes which accept announcements from the announcement miners in the network, they also provide announcements to the block miners. As you scale up the amount of bandwidth in the pool, you will need to add more Ann handlers.
- Block Miner (one or more) - These nodes download announcements from the announcement handlers and use them in the mining process to mine blocks.
- Block Handlers (one or more) - These nodes receive "block shares" from the block miners and submit blocks if
- Paymaker (1) - This node receives updates from the Ann Handlers and Block Handlers and keeps track of who should be paid. The Paymaker sends configuration to the pktd node which is used by the Master in order to make the pool pay out the announcement and block miners
PacketCrypt Data Flow
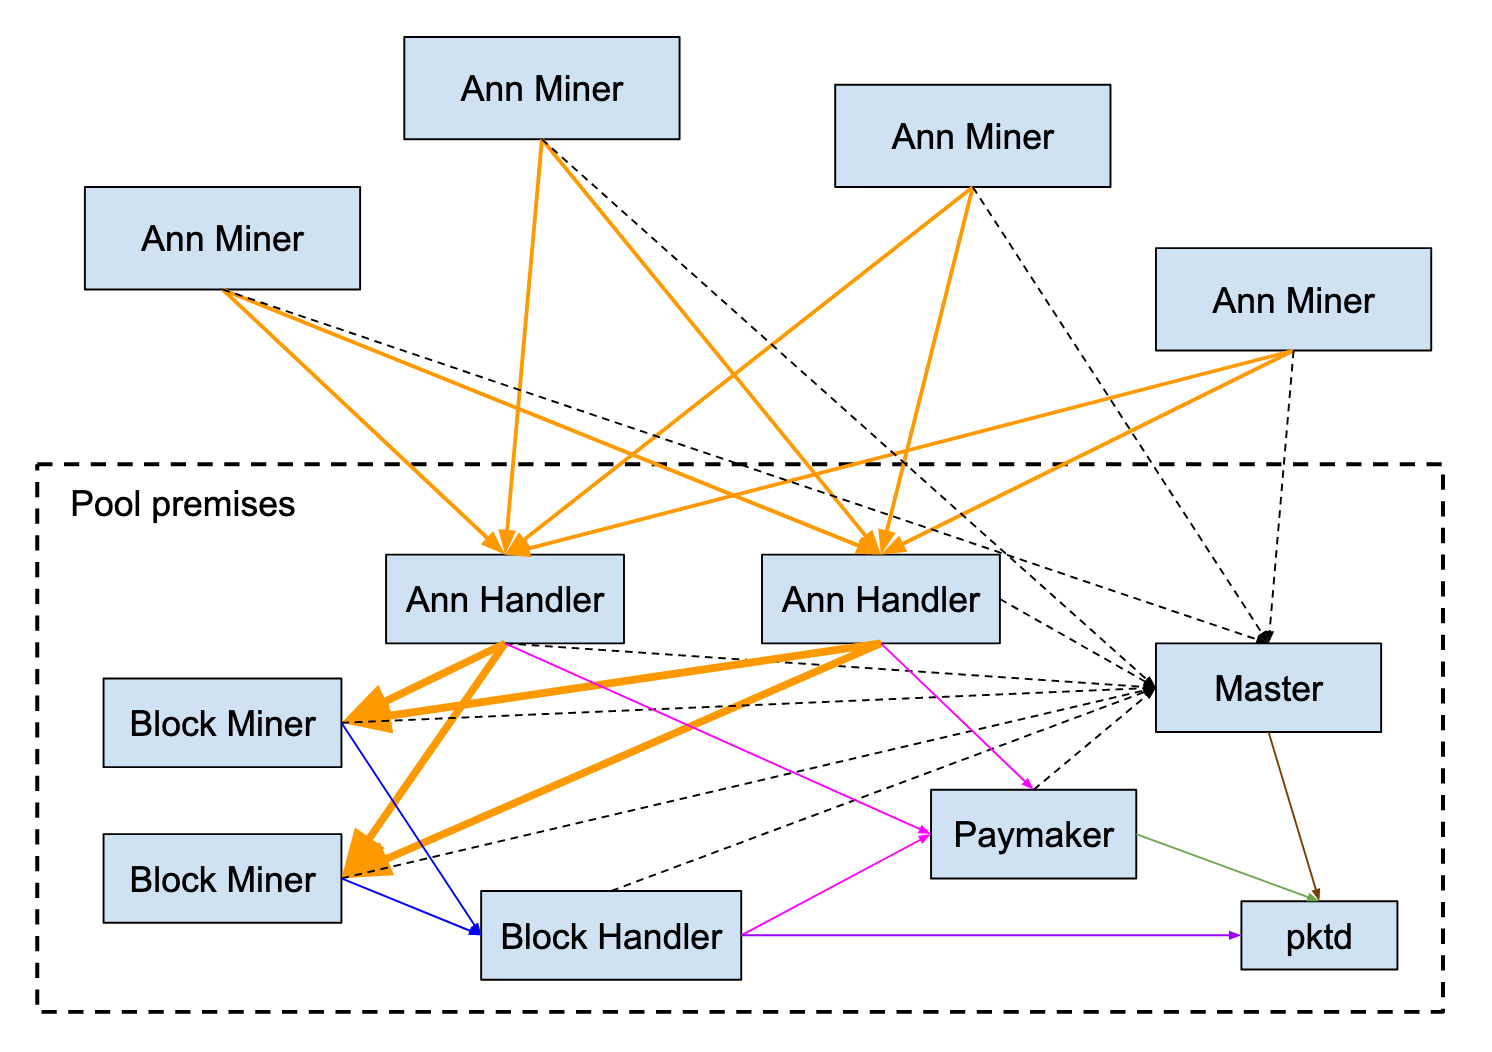
- █ Orange: Announcements are sent from the Announcement miners to the Ann Handlers and then to the Block miners
- █ Blue: Block shares are sent from block miners to Block Handler(s)
- █ Purple: Winning blocks are submitted by the Block Handler(s) to pktd and the PKT network
- █ Pink: Block Handlers and Ann Handlers inform Paymaker of work done by announcement and block miners
- █ Green: Paymaker configures pktd instance to create blocks which pay the people who have been mining
- █ Brown: Master gets block templates from pktd instance
- Black dotted line: All nodes request configuration and block templates from Master node
More Information and PacketCrypt Pool Code
The code and documentation for running a pool is available on the C / nodejs version of the PacketCrypt project, the new Rust version only contains Announcement Miner and Announcement Handlers.
Announcement Difficulty
PacketCrypt is designed in such a way that a mining pool can double its effective power by:
- Doubling the total block mining computation effort
- Doubling the total announcement mining computation effort, or
- Doubling the amount of bandwidth between announcement miners and the pool
The way that a pool operator limits the amount of bandwidth flowing into the pool, to prevent overloading of the network, is by setting what is known as the announcement difficulty. The announcement difficulty for a pool specifies how much work must be done on an announcement in order for the announcement to be accepted and paid out by the pool. Announcement difficulty serves to slow down the announcement miners to protect the pool's network.
In general, doubling the announcement difficulty will halve the amount of bandwidth used by the
pool and will also halve the pool's overall mining power, with a limit that setting the announcement
difficulty lower than 2 does not bring any additional value. To explain why it works like this,
we need to examine the PacketCrypt algorithm rules and the in particular how the block mining software
decides which announcements to use when attempting to mine a block.
Announcement Set Selection
PacketCrypt algorithm allows block miners to perform less work if they are able to prove that they had a certain number of "high value" announcements in memory at the time of mining, the exact ratio of actual work a block miner must do to the amount of work the PKT blockchain requires is called the power multipler.
For a block miner seeking to optimize their power multiplier, every announcement has a particular level of utility value which is based on the amount of work that was done by the announcement miner (announcement difficulty) and how old the announcement is. We call this the effective difficulty.
The effective difficulty of an announcement starts off as the actual difficulty of the work done to mine it and then decreases by half every block-period until it is less than 1 and the announcement is no longer usable for mining.
The block mining software selects a subset of announcements which which will give it the best power multiplier based on the PacketCrypt algorithm:
power_multiplier = min(effective_difficulty) * ann_count ** 2
The min(effective_difficulty) is the effective difficulty of the "least valuable" announcement
that is being mined with.
Lets assume that announcement miners are providing a steady supply of 1000 announcements per block-period and all announcements have an initial announcement difficulty of 128. The block mining software can choose to mine with 1000 announcements at 128 effective difficulty, or with 2000 announcements at 64 effective difficulty, or with 3000 announcements at 32 effective difficulty and so on.
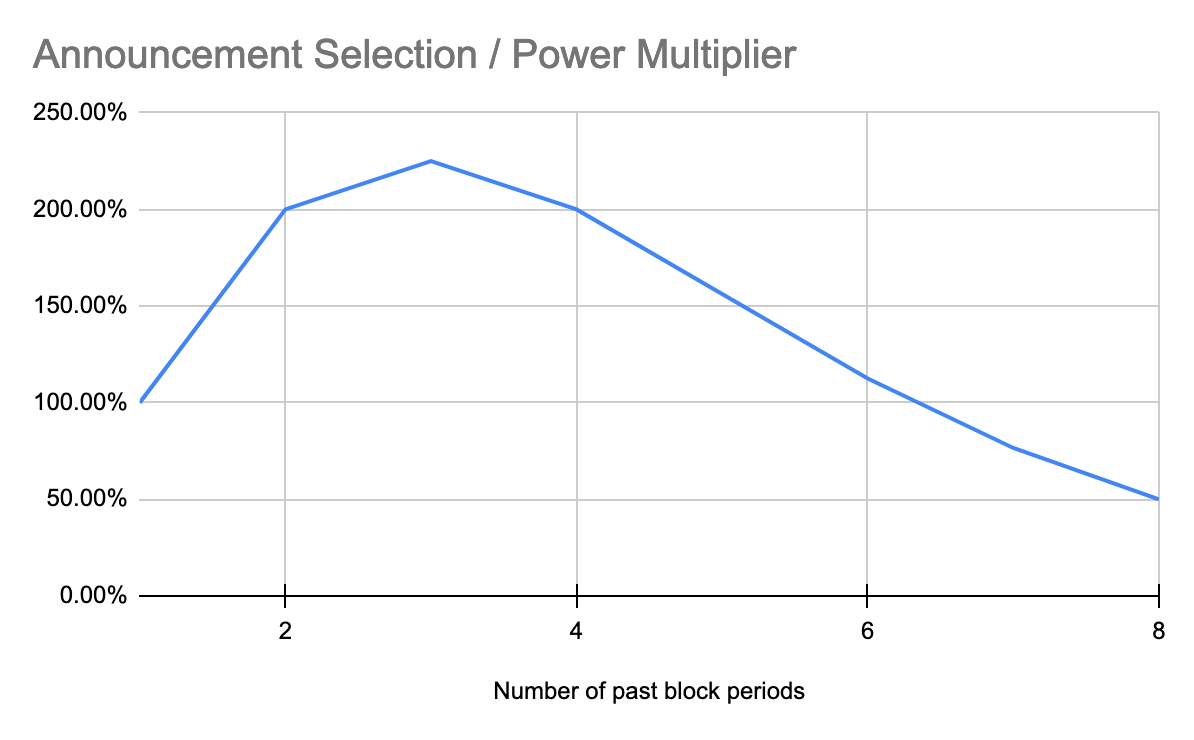
The best choice is to use the previous three block periods which provides a power multiplier that is 225% higher than that of using just the most recent 1 period worth of announcements. This curve is the same no matter what difficulty we are starting with.
Optimal Difficulty Curve
Knowing that the optimal announcement set is all of those announcements mined over the past 3 block periods, we can compute the overall power of a pool as the announcement difficulty is raised.
At announcement difficulty 1, announcements cannot be used for more than 1 block, but if we imagine
that the announcement mining community can produce 1000 announcements per block at difficulty 1 then
we can reason that the power multiplier will be 1000 ** 2 or 1 million.
At difficulty 2 we can expect the announcement miners will produce 500 announcements per block period but since 2 block periods can be used, the power multiplier is the same.
At difficulty 4, the announcement miners will produce 250 announcements per block period and they
will be valid for 3 block periods making the power multiplier 750 ** 2 or 562,500.
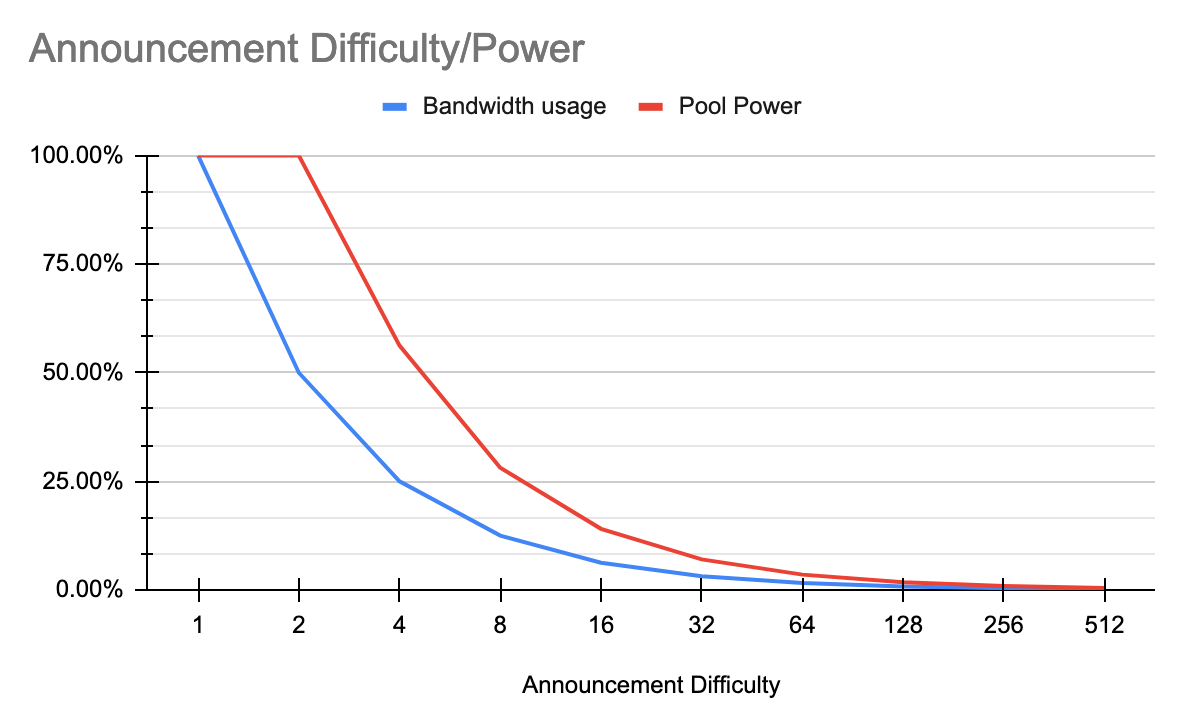
From here, the power output of the power multiplier of the optimal announcement set halves for each
doubling of the announcement difficulty, making the optimal difficulty 2.
FAQ for ANN Miners
What does overflow mean?
When the ann handler receives an announcement, it puts it into a queue, when the queue fills up it responds overflow immediately. The queue can become long, so you may receive "operation timed out" you're still being paid, when you receive "overflow" you are not being paid.
Unfortunately, you may also receive "operation timed out" because the handler is unresponsive, it's not obvious which is the reason from looking at the logs.
For example, what you will see in the AnnMiner Logs:
1618394538 INFO annmine.rs:519 467 Ke/s 28.56Mb/s overflow: [0, 0, 3072, 0] uploading: [0, 0, 17632, 0] accept/reject: [26932/0, 0/0, 4856/0, 796/0] - goodrate: [100%, 100%, 61%, 100%]
- 467 Ke/s 467 kilo-encryptions (thousands of encryptions) per second of mining power.
- 28.56Mb/s Total upload bandwidth (to all pools - combined)
- overflow: [0, 0, 3072, 0] Overflowed the internal queue of the ann miner, before it was even able to upload to the pool, one number for each pool you're mining to.
- 3072 Number of anns which are not uploaded to pool #3.
- uploading [0, 0, 17632, 0] Number of anns currently in-flight in active http requests, again 3rd pool is a problem, others are doing well (in this example).
- accept/reject [26932/0, 0/0, 4856/0, 796/0] Anns accepted/rejected by each pool, these numbers are based on the previous 10 seconds, pool #2 is giving a zero accepted which might be an issue, keep watching the next message 10 seconds later for another update.
- goodrate [100%, 100%, 61%, 100%] Goodrate = number of anns accepted divided by number of anns produced.
Setting up a Pool
Expectations
- General knowledge of Linux
- General knowledge of git
- General knowledge of networking
- General knowledge of blockchain
- Access to at least 6 machines running Ubuntu 18.04 LTS or 20.04 LTS, to deploy the following services.
- Machine 1: PKT node
- Machine 2: Master, Paymaker & Blkhander
- Machine 3: AnnHandler
- Machine 4: AnnHandler
- Machine 5: BlkMiner
- Machine 6: BlkMiner
Note: It can be done all on a single machine, you just need to pay attention to ports etc. As of June 2022, the network difficulty is high, and given that half of the work is done at pool premises, it's recommended to run at least a dozen BlkMiner machines, with a significant (768GB recommended) ammount of RAM.
Block mining & running a pool
Starting your own pool requires setting up a number of services:
- pktd node (one or more) - One pktd instance is required for the Master to function, each of the Block Handlers may optionally use separate pktd nodes.
- Master (one) - This node coordinates all of the others and provides work files and configuration
- Ann Handler (two or more) - These are nodes which accept announcements from the announcement miners in the network, they also provide announcements to the block miners. As you scale up the amount of bandwidth in the pool, you will need to add more Ann handlers.
- Block Miner (two or more) - These high performance nodes download announcements from the announcement handlers and use them in the mining process to mine blocks.
- Block Handlers (one or more) - These nodes receive "block shares" from the block miners and submit blocks if they validate the share
- Paymaker (one) - This node receives updates from the Ann Handlers and Block Handlers and keeps track of who should be paid. The Paymaker sends configuration to the pktd node which is used by the Master in order to make the pool pay out the announcement and block miners
General Information
Repository Information:
The following repositories hold the required programs to run a pool:
| Repository | Tools |
|---|---|
| packetcrypt_rs: https://github.com/cjdelisle/packetcrypt_rs | AnnHandler, Blkminer, AnnMiner |
| PacketCrypt: https://github.com/cjdelisle/PacketCrypt/ | Master, Paymaker, BlkHandler |
| pktd: https://github.com/pkt-cash/pktd | pktd |
Assumed network Ranges:
In this guide we have two separate networks, the public network (198.51.100.0/24), and local network (10.0.16.0/24) to connect AnnHandlers and BlkMiner.
| Machine | Public Network IP | Private Network IP |
|---|---|---|
| Machine 1 | 198.51.100.1 | 10.0.16.1 |
| Machine 2 | 198.51.100.2 | 10.0.16.2 |
| Machine 3 | 198.51.100.3 | 10.0.16.3 |
| Machine 4 | 198.51.100.4 | 10.0.16.4 |
| Machine 5 | X | 10.0.16.5 |
| Machine 6 | X | 10.0.16.6 |
Assumed Port Ranges:
| Service | Machine | Port/Port Ranges |
|---|---|---|
| Master | Machine 2 | 8080 |
| Paymaker | Machine 2 | 8081 |
| BlkHandlers | Machine 2 | 8100-8200 |
| AnnHandlers | Machine 3 & 4 | 80 |
Installation
Machine 1
PKTD node:
150GB of storage is required at a minimum to run the pktd node. Recommended size is around 250GB of NVMe storage.
- Install Golang
sudo add-apt-repository ppa:longsleep/golang-backports
sudo apt update
sudo apt install golang-go
- Install git
sudo apt install git
- Install the pktd node
git clone --branch develop https://github.com/pkt-cash/pktd
cd pktd
./do
The output should show the following:
Everything looks good - use ./bin/pktd to launch
Machine 2
Master | Paymaker | BlkHandler:
- Install the required tools:
cd ~
sudo add-apt-repository universe
sudo apt install git
sudo apt install make
sudo apt install npm
sudo npm cache clean -f
sudo npm install -g n
sudo n stable
Restart your shell ### Add here how to get latest stable version of node
- Clone the source code:
git clone --branch master https://github.com/cjdelisle/PacketCrypt
- Build the PacketCrypt code
cd PacketCrypt
npm install
Machine 4 - 6
BlkMiner | AnnHandler | AnnMiner:
- Install the Required tools:
sudo apt install gcc git
sudo apt install curl
curl --proto '=https' --tlsv1.2 -sSf https://sh.rustup.rs | sh
- Clone packetcrypt_rs
git clone --branch develop https://github.com/cjdelisle/packetcrypt_rs
- Compile PacketCrypt
cd packetcrypt_rs
~/.cargo/bin/cargo build --release --features jemalloc
Config of pool.js
Information:
- pool.js is located at:
~/PacketCrypt/pool.example.js - You need to edit this file, then run:
cp ~/PacketCrypt/pool.example.js ~/PacketCrypt/pool.js
config.privateSeed
Signing of announcements is rarely used, it breaks people mining into multiple pools, and you should set it to null unless "you know what you're doing"
This seed is used for deriving keys which will be used for signing announcements.
Setting this value to an alphanumeric value e.g
oHk8TXpbtRRZGtaYYMnIFAzYMrVh6vA8XzKWWXcKbzCThuFLIJ234bHN5peddQFzR2TtQyo58gcFRP7bKg9BeXZirSqp9gVpjBWp
In general, this value should be set to the null, as signing announcements is rarely used, and breaks Announcement mining with multiple pools if you have your pool externally accessable, and should only be set if you have a strong understanding and knowledge of what you are doing.
config.privateSeed = null
If you aren't bothered by, or don't require your announcements to be signed .
config.paymakerHttpPasswd
Anyone who has this password can make http posts to the paymaker (claim that shares were won) You should make this random and also firewall the paymaker from the public. The upload will be done using Authorization Basic with a username of "x" and this as the password
config.paymakerHttpPasswd = 'anyone with this password can post results to the paymaker';
You can put the paymaker behind an http proxy if you wish.
config.masterUrl
This is used by the paymaker and block handler when running them with pool.js, it is used to resolve where the master is.
You can either set this as a locally host or put your master behind a nginx proxy
config.masterUrl = 'http://localhost:8080';
or if you have your instance public, and you want to have it be resolvable publically, replace the url with your own.
config.masterUrl = 'http://pool.pktpool.io';
config.rpc
The username and password set here, should be the same username and password used at the end of this guide for when you configure the pktd service.
user:  'x',
pass:  'x',
config.annHandlers
Information:
- config.annHandlers is a list of json object, with an object for each individual annhandler you would like to run, each ann handler will require it's own individual port.
- As the AnnHandler will be run on the same machine as the BlkMiner you need to make sure there are no over-lapping port bindings.
- If you plan to allow external AnnMiners (AnnMiners not on your LAN to mine against your pool, the url's placed in the AnnHandlers list, should be externally resolvable.
The address that is advertized for accessing this ann handler (external address)
If running locally use:
url: 'http://10.0.16.3:8081','http://10.0.16.4:8081'
If allowing external annminers use a resolved address such as:
url: 'http://ann1.pktpool.io','http://ann2.pktpool.io'
Replace the url with your own.
config.blkHandlers
Information:
- config.blkHandlers is a list of json object, with an object for each individual annhandler you would like to run, each ann handler will require it's own individual port.
- BlockHandlers are low-effort high-volume single-threaded workers.
What address should be advertized for accessing this BlkHander, again make sure there are no overlapping ports.
If you are wanting to support external blockminers, this address should be externally resolvable
url: 'http://localhost:8100',
This is the port that the blkHandler will bind to.
port: 8082,
This is the host that the blkHandler will bind to.
host: '::',
This is how many requests a blkHandler can queue before the handler starts rejecting requests
maxConnections: 50,
root: config
config.master
Which port to run the master on
port: 8080,
What address to bind to, set to localhost if proxying
host: '::',
Minimum work for an announcement. This number is effectively a bandwidth divisor, every time you double this number you will reduce your bandwidth by a factor of two.
annMinWork: Util.annWorkToTarget(128),
Average number of shares per block, reducing this number will reduce load on your block handlers, but increasing it will allow payment to be spread more evenly between block miners.
This wants to be set to a higher number than one, for the purpose of constantly testing that the block miners are making valid shares. You may have a block miner sitting for hours without a share and then when it wins one, it can become invalid because of misconfiguration
shareWorkDivisor: 4,
Which versions of announcements we will accept
annVersions: [1],
Request that ann miners mine announcements that are this many blocks old.
Announcements contain a commitment of the most recent block hash but they need 3 blocks to "mature" before they can be used
The point of this is so that PacketCrypt is about bandwidth, not latency.
But there is a risk: If there is a surge then you are going to be starved for announcements
When you are starved, you will have few usable anns which causes a slow-down in mining and the announcements which are being submitted are not usable.
When you win a few blocks, those announcements become usable and you surge, which causes you to go back into starvation again.
This should be set to either:
- 0 Which means the announcements you are receiving are used instantly
- 3 Which means you are waiting for the announcements to mature before using them.
If running your own AnnMiners, it is advisable to set this to 0, and add the --mineold 3 to some of your AnnMiner startups on the CLI.
This helps to keep a balance between keeping your pool as powerful as possible, along with having AnnMiners to help out in the case of a starvation
mineOldAnns: 0,
config.payMaker
How the miners should access the paymaker (external address), replace the url with your own.
url: 'pool.pktpool.io',
Which port to run the paymaker on
port: 8081,
What address to bind to, set to localhost if proxying
host: '::',
Seconds between sending updates to pktd. If this set to zero, the payMaker will accept log uploads but will not send any changes of payout data to pktd.
updateCycle: 120,
updateCycle: 0 to disable
How many seconds backward to keep history in memory
historyDepth: 60 * 60 * 24 * 30,
Maximum number of simultanious connections to accept before sending 500 errors
maxConnections: 200,
annCompressor
Store data in 1 minute aggregations
timespanMs: 1000 * 60,
Allow data to be submitted to any of the last 10 aggregations
slotsToKeepEvents: 10,
What fraction of the payout to pay to block miners (the rest will be paid to ann miners) (Pay per last N shares)
blockPayoutFraction: 0.5,
What percent of the total winnings should be taken for pool management
poolFee: 0.40,
The address which should be paid the pool fee
poolFeeAddress: "pkt1qyc9dkhca7uc84zn3vlgd0h0fxr3twwn34qgeqe",
This constant will affect how far back into history we pay our announcement miners (Pay per last N shares)
pplnsAnnConstantX: 0.125,
This constant will affect how far back into history we pay our block miners (Pay per last N shares)
pplnsBlkConstantX: 2,
When there are not enough shares to fairly spread out the winnings, pay what is left over to this address.
defaultAddress: "pkt1q6hqsqhqdgqfd8t3xwgceulu7k9d9w5t2amath0qxyfjlvl3s3u4sjza2g2",
When something goes wrong, direct pktd to send all coins here, if this is different from the defaultAddress then it is possible to account for and pay out to the miners later when the problem is fixed.
errorAddress: "pkt1q6hqsqhqdgqfd8t3xwgceulu7k9d9w5t2amath0qxyfjlvl3s3u4sjza2g2",
Config of pool.toml
Information:
- pool.example.toml is located at: ~/packetcrypt_rs/pool.example.toml
- You need to edit this file, then run: ~/packetcrypt_rs/pool.example.toml ~/packetcrypt_rs/pool.toml
Password used by your paymaker to post logs for payment, the same as config.paymakerHttpPasswd
paymaker_http_password = "you'll want this to be a secret"
URL of the pool master, used for getting configuration and work, the same as: Replace the url with your own.
master_url = "http://pool.pktpool.io"
ann_handler.ah*
You can have multiple ann_handlers, you can do this by defining each one such as:
[ann_handler.ah0]
    "parameters"
[ann_handler.ah1]
    "parameters"
These can all be in a single file to be used by each annhandler, when starting the annhandlers, you would start them with on each respective machine:
packetcrypt ah --config /path/to/config.toml ah0
packetcrypt ah --config /path/to/config.toml ah1
Number of threads to dedicate to the AnnHandler
num_workers = 8
Length of the input queue, keeping this low will create back-pressure and prevent miners from posting too many announcements when the server is in fact overloaded
input_queue_len = 256
The public url of the annhandler, this should match what is set in your pool.js Replace the url with your own.
public_url = "http://ann1.pktpool.io/submit"
Bind to this port
bind_port = "198.51.100.3:80"
Bind this port to the sprayer component
bind_pvt = "10.0.16.3:6666"
Set sprayer
spray_at = ["239.0.1.1:6667"]

spray_workers = 8
For Machine 3 you should end up with something like this
[ann_handler.ah0]

    block_miner_passwd = "no one steals my anns"

    skip_check_chance = 0

    num_workers = 8

    input_queue_len = 512

    public_url = "http://ann1.pktpool.io/submit"

    bind_pub = "198.51.100.3:80"

    bind_pvt = "10.0.16.3:6666"

    spray_at = ["239.0.1.1:6667"]

    spray_workers = 8

    subscribe_to = []

    files_to_keep = 512
The same logic should be followed for Machine 4 and other handlers you may have.
NOTE: To bind low ports with non-root user run:
sudo setcap CAP_NET_BIND_SERVICE=+eip $(which packetcrypt)
Running Manually
Machine 1
Information:
- These tasks need to be run in the order they are presented
- PKTD needs to have downloaded the full chain first, you will know when the node is upto date when height is equal to the current block on the explorer It can take 12+ hours to fully sync to the current block height
PKTD
--rpcuser and --rpcpass should match the values set in pool.js under config.rpc
./pktd/bin/pktd --rpcuser=XXX --rpcpass=XXX --miningaddr <your PKT wallet address>
Machine 2
Master
node ./pool.js --master
Paymaker
node ./pool.js --payMaker
BlkHandler(s)
Launch the BlkHandler nodes, specify --blk0 for the first BlkHandler, --blk1 for the second, and so forth
cd PacketCrypt
node ./pool.js --blk0
node ./pool.js --blk1
Machine 3
AnnHandler
cd packetcrypt_rs
./target/release/packetcrypt ah --config /path/to/pool.toml ah0
Machine 4
AnnHandler
cd packetcrypt_rs
./targer/release/packetcrypt ah --config /path/to/pool.toml ah1
Machine 5 and 6
BlkMiner
--threads is the number of threads you want to dedicate to the Blkminer, the default is to use all available threads.
--paymentaddr is the wallet you want your coins to be mined into, it is advisable to not use the electrum wallet for this.
--memorysizemb is how much RAM you are allocating to block mining, Ideally you want to set as much as you can.
<Master address of pool> is the masterUrl of your pool
cd packetcrypt_rs
./target/release/packetcrypt blk <Master Address of Pool> --paymentaddr <your PKT wallet address> --threads 80 --memorysizemb 665000 --handlerpass NoOneStealsMyAnns --subscribe 10.0.16.3:6666 --bind 0.0.0.0:6667 --mcast 239.0.1.1
NGINX Setup (For allowing external AnnMining)
Machine 2
Update system and install Nginx
sudo apt update
sudo apt install nginx
Unlink default nginx site
unlink /etc/nginx/sites-enabled/default
cd /etc/nginx/sites-available
Create and edit the reverse-proxy.conf file
vim reverse-proxy.conf
The config for the services:
server {
    listen 80;
    listen [::]:80;
    server_name <masterURL>;
    location / {
        proxy_pass http://localhost:8080/;
        }
}

server {
    listen 80;
    listen [::]:80;
    server_name paymaker.pktpool.io;
    location / {
        proxy_pass http://localhost:8081/;
        }
}
Link new file to sites-enabled
ln -s /etc/nginx/sites-available/reverse-proxy.conf /etc/nginx/sites-enabled/reverse-proxy.conf
Remove default config
rm default
Check reverse proxy config is correct
nginx -t
Reload nginx to pick up config changes.
sudo systemctl reload nginx